Why Mini Split AC Install Projects Are Gaining Popularity
A mini split AC install is the modern solution for New Jersey homeowners who want efficient, flexible climate control without disruptive ductwork installation.
Quick Answer: Essential Mini Split Installation Steps
- Choose the right system: Calculate BTU needs for your space.
- Mount indoor unit: Place high on a wall, away from heat sources.
- Install outdoor unit: Set on a level surface with proper clearance.
- Drill wall penetration: Create a 3-inch hole at a slight downward angle for drainage.
- Connect refrigerant lines: Use proper flaring and torque specifications.
- Complete electrical work: A dedicated circuit is required (hire an electrician).
- Test system: Verify cooling, heating, and leak-free operation.
Mini split systems are popular for good reason. They offer energy efficiency up to 30% better than conventional systems, operate quietly, and provide room-by-room temperature control. Installation involves mounting an indoor air handler and connecting it to an outdoor condenser via a small hole in the wall.
While some systems are designed for DIY, the process requires precision. Critical steps like electrical connections and refrigerant handling require licensed professionals to ensure safety, performance, and warranty compliance. A professional installation can take from a few hours to a full day.

Pre-Installation Prep: Planning for Success
Proper planning is the key to a smooth mini split AC install. This section covers the essential prep work to do before you pick up a single tool.
Choosing the Right Mini-Split System
Selecting the right size and type of system is critical for comfort and efficiency.
System Types
- Single-zone systems connect one indoor unit to one outdoor unit, perfect for conditioning a single room or area like a home office or bedroom.
- Multi-zone systems connect one outdoor unit to multiple indoor units (usually 2-5), allowing for independent temperature control in different rooms. This is ideal for whole-home solutions.
Getting the BTU Calculation Right
BTU (British Thermal Unit) capacity determines your system’s cooling and heating power. Too little capacity means the unit runs constantly without hitting the target temperature. Too much capacity causes the unit to short-cycle, wasting energy and failing to dehumidify properly.
Key factors for sizing include:
- Room size: A general starting point is 12,000 BTUs for every 400-500 square feet.
- Insulation: Poorly insulated spaces require more BTUs.
- Climate: New Jersey’s humid summers and cold winters impact both cooling and heating needs.
- Other factors: Consider ceiling height, window size and orientation (south-facing windows add heat), and heat-generating appliances.
Always consult the manufacturer’s sizing guide. For detailed help, see our Guide to Ductless Installation.
Essential Tools and Materials
Gathering your tools and materials beforehand prevents delays.
Tool Arsenal:
- Drill with a 3.5″ hole saw bit
- Stud finder
- Level
- Torque wrench (for refrigerant lines)
- Adjustable wrenches
- Wire strippers
- For non-DIY systems: Tubing cutter, flaring tool, vacuum pump, and micron gauge.
Key Materials:
- Outdoor unit foundation: A condenser pad or mounting bracket.
- Lineset cover: Protects lines and provides a clean look.
- Sealant: Exterior-grade sealant for the wall penetration.
- Fasteners and electrical wire: Appropriate for your wall type and unit’s power needs.
DIY vs. Professional Installation: A Crucial Decision
While DIY kits are available, it’s important to weigh the pros and cons.
The DIY Route
- Pros: The main appeal is cost savings on labor. Some systems with pre-charged lines and quick-connect fittings are designed for handy homeowners.
- Cons: Involves safety risks, especially with electrical work. Refrigerant handling is dangerous, environmentally regulated, and requires EPA certification. Specialized tools can be expensive, and many manufacturers void warranties on non-professional installations.
Professional Installation
- Pros: Licensed technicians bring expertise, ensuring correct sizing, placement, and connections. They have the proper tools, adhere to safety codes, and preserve your warranty. They are legally certified to handle refrigerant.
- Cons: Higher upfront cost due to labor.
For guaranteed performance and peace of mind, professional installation is often the wisest choice. Learn more about our Expert AC Installation Services. The choice depends on your skill level, the system type, and local codes.
The Step-by-Step Mini Split AC Install Guide
This section is your roadmap through the physical installation process, covering each critical step from safety checks to mounting the units.
Critical Safety Precautions First
Safety is non-negotiable. Before starting, understand these key precautions.
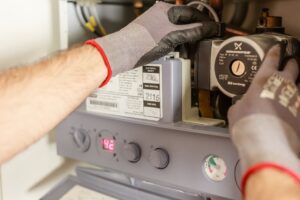
- Electrical Safety: Mini-splits require a dedicated circuit. Always turn off the power at the breaker before working on any wiring. Use a multimeter to confirm the power is off. If you are not a licensed electrician, hire one for this part of the installation. It’s the safest choice and often required by local codes.
- Personal Protective Equipment (PPE): Always wear safety glasses when drilling and gloves to protect your hands from sharp edges.
- Refrigerant Handling: Refrigerant is under high pressure and can cause severe frostbite. Releasing it is illegal, and handling it requires EPA 608 certification. This step is for professionals only, unless you are using a DIY kit with pre-charged, quick-connect lines.
For more safety insights, resources like How to Install a Mini-Split Air Conditioner can be helpful.
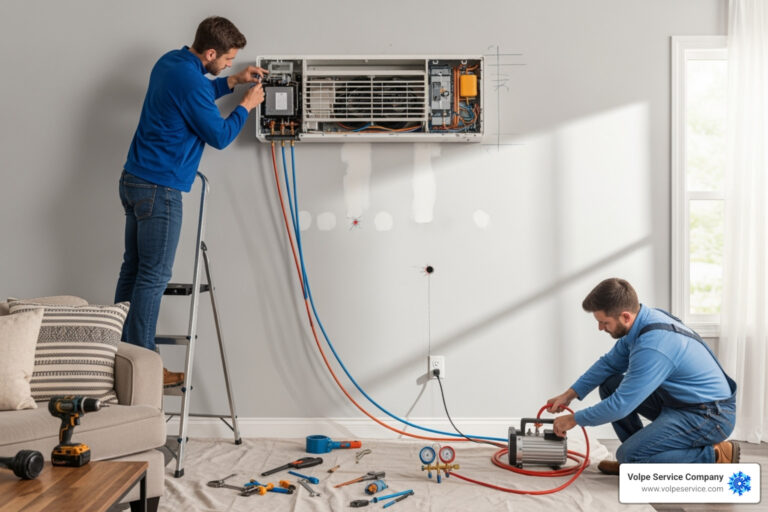
Positioning and Mounting the Indoor & Outdoor Units
Proper placement is crucial for system performance and longevity.

Indoor Unit Placement:
- Mount it high on an exterior wall for easier line routing.
- Secure the mounting bracket directly to wall studs for solid support.
- Ensure at least six inches of clearance from the ceiling and adjacent walls for proper airflow.
- Keep the unit away from direct sunlight and heat sources (like TVs or lamps) that can confuse the thermostat.
Outdoor Unit Placement:
- Place it on a stable, level foundation. A concrete pad or an Optional Condenser Pad works well to prevent vibration and ensure proper drainage.
- Allow at least 12 inches of clearance on all sides for adequate airflow.
- Choose a shady spot if possible to improve efficiency, and place it where noise won’t be a nuisance.
Creating the Connection: Drilling and Running the Lineset
This step creates the physical link between your indoor and outdoor units.

- Mark the Hole: Use the manufacturer’s template to mark the spot for the lineset penetration, ensuring you won’t hit any studs, pipes, or wiring.
- Drill with an Angle: Using a 3.5″ hole saw, drill from the inside out at a slight downward angle (about 5 degrees). This is essential to ensure the condensate drain line works correctly and prevents water damage.
- Bundle the Lines: Carefully bundle the refrigerant pipes, drain hose, and electrical communication wire together with electrical tape. Crucially, place the drain hose at the bottom of the bundle to allow for gravity-fed drainage.
- Feed the Lines: Gently feed the bundled lines through the wall. A helper outside can guide them to prevent kinking the delicate refrigerant lines.
- Seal the Penetration: Insert the wall sleeve and seal the opening around the lineset on the exterior with weatherproof sealant. This prevents air leaks, water intrusion, and pests.
Final Connections and System Testing
This phase involves the most technical work, where precision is key to a leak-free, efficient system. Many of these steps require professional expertise and specialized tools.
The Technical Side of a mini split AC install
Connecting the lines correctly is critical for your system’s health.
Refrigerant Line Connection:
- Flaring: If your system uses copper tubing, the ends must be perfectly flared. Deburr the tube end, ensure it extends the correct distance from the flaring block, and create a smooth, even flare.
- Torque: Use a torque wrench to tighten the flare nuts to the exact specifications in the manufacturer’s manual. Over-tightening cracks the flare, and under-tightening causes leaks. Hand-thread first to avoid cross-threading.
- Bending: Bend copper lines slowly and carefully to avoid kinks, which restrict refrigerant flow and drastically reduce efficiency.
Drain Line Connection:
- Slope: The condensate drain line must have a continuous downward slope from the indoor unit to the outside. Any dips will create clogs and potential water damage.
- Route: Ensure the line is free of kinks and terminates in a location where water can drain away from your home’s foundation.
For a deeper dive into these steps, see our guide on the Mini Split Installation Process Explained.
Electrical Work and Refrigerant Integrity
These steps carry the highest safety risks and are best left to certified professionals.
Electrical Connections:
- Wiring: The communication wires between the indoor and outdoor units must be connected to the correct terminals as shown in the wiring diagram. Incorrect wiring will cause system errors.
- Hiring an Electrician: Running a new dedicated 120V or 240V circuit from your main electrical panel to the outdoor unit is a job for a licensed electrician. This ensures the work is safe, up to code, and properly sized for your unit.
Refrigerant Integrity (For non-DIY systems):
This is a multi-step process requiring EPA certification and specialized equipment.
- Pressure Test: After connecting the lines, a professional will pressurize the system with nitrogen to check for leaks at every connection point.
- Vacuum Evacuation: A vacuum pump is used to remove all air and moisture from the refrigerant lines. This is a critical step, as moisture can create acids that destroy the system from within.
- Micron Gauge: A micron gauge is used to verify a deep vacuum (typically 500 microns or lower) has been achieved, confirming the system is dry and leak-free.
This process is detailed in guides like Ductless Mini-Split Step-by-Step Installation.
Powering Up and Final Checks
It’s time to bring your new system to life and confirm everything is working correctly.

System Testing Checklist:
- Restore power at the breaker.
- Turn the unit on and check for cool air in cooling mode and warm air in heating mode.
- Test all remote control functions (modes, fan speeds, temperature).
- Listen for any unusual grinding, rattling, or squealing noises.
Finishing Touches:
- Install lineset covers over the exterior lines for protection and a clean, professional appearance.
- Clean up the work area, removing all tools and debris.
With these final checks, your mini split AC install is complete.
Post-Installation: Common Pitfalls and Ongoing Care
Your installation is complete, but proper care ensures your system runs efficiently for years. Here’s how to avoid common mistakes and maintain your unit.
Avoiding Common mini split AC install Mistakes
Even a well-installed system can suffer from small errors that lead to big problems. Be aware of these common pitfalls:
- Improper Flare Connections: The most common issue. A poorly made flare or incorrect torque on the connection nuts will cause slow refrigerant leaks, reducing efficiency and eventually damaging the compressor.
- Kinked Refrigerant Lines: Sharp bends in the soft copper lines act like a bottleneck, restricting refrigerant flow and forcing the system to work harder, increasing energy bills.
- Incorrect Wiring: Mixing up the communication wires between the indoor and outdoor units can lead to error codes and prevent the system from operating correctly.
- Poor Sealing: Failing to properly seal the wall penetration with weatherproof sealant allows air leaks, water intrusion, and pests into your home.
- Wrong Unit Location: Placing the indoor unit near a heat source can confuse its thermostat, while an outdoor unit without enough airflow clearance will run inefficiently.
- Improper Drain Line Slope: A drain line without a consistent downward slope will develop clogs from standing water, leading to backups and water damage.
Long-Term Maintenance for Optimal Performance
Mini-splits are low-maintenance, but a few simple tasks are key to their longevity and efficiency.
- Clean Filters Monthly: The washable filters in your indoor unit catch dust and debris. Clogged filters restrict airflow and reduce performance. Simply rinse them with water once a month, let them dry, and slide them back in.
- Keep the Outdoor Unit Clear: Ensure the area around the outdoor condenser is free of leaves, grass clippings, and other debris that can block airflow and hinder heat exchange.
- Schedule Annual Professional Check-ups: A yearly service visit from an HVAC professional is crucial. A technician will perform a deep cleaning of the coils, check refrigerant levels, inspect electrical connections, and ensure the drain line is clear. This preventive maintenance catches small issues before they become costly repairs.
For more answers on ownership, check our Mini Split Installations Questions guide.
Frequently Asked Questions about Mini-Split Installation
Here are answers to the most common questions we receive about mini split AC install projects.
How much does a mini-split installation cost?
The typical investment for a professional installation ranges from $2,000 to $10,500. The final cost depends on several factors:
- System Size (BTU): Higher capacity units cost more.
- Number of Zones: A multi-zone system with several indoor units is more expensive than a single-zone system.
- Installation Complexity: Difficult line runs, complex electrical work, and architectural challenges can increase labor costs.
- Unit Features: Models with higher SEER ratings (efficiency), advanced filters, or smart features have a higher upfront cost but can lead to long-term savings.
Can I install a mini-split myself?
It depends. DIY-friendly kits with pre-charged, quick-connect lines have made self-installation possible for those with strong technical skills. However, there are critical considerations:
- Electrical Work: Most mini-splits require a new dedicated circuit. This work should always be performed by a licensed electrician for safety and code compliance.
- Traditional Systems: Systems without pre-charged lines require specialized tools (vacuum pump, gauges) and EPA 608 certification to handle refrigerant legally.
- Warranty: Many manufacturers will void the warranty if the system is not installed by a certified HVAC professional.
For these reasons, professional installation is often the safest and most reliable option.
How do I choose the right size mini-split?
Correct sizing is essential for comfort and efficiency. An undersized unit won’t cool properly, while an oversized unit will short-cycle, wasting energy and failing to dehumidify.
Sizing is more than just square footage. A professional load calculation considers:
- Square footage and ceiling height
- Insulation quality
- Number, size, and orientation of windows
- Local climate (e.g., New Jersey’s hot, humid summers)
- Heat-generating sources (people, electronics, appliances)
While manufacturer guides provide a starting point, a professional consultation ensures your system is perfectly matched to your home’s unique needs.
Conclusion
A successful mini split AC install delivers zoned comfort, significant energy savings, and quiet operation, all without the need for extensive ductwork. A single small hole connects the indoor and outdoor units, changing your home’s climate control.
While DIY kits have made installation more accessible, professional expertise remains vital for the most critical steps. Electrical work must be handled by a licensed electrician to ensure safety and code compliance. For traditional systems, only EPA-certified technicians can legally and safely handle refrigerants. Avoiding common mistakes like improper flares or kinked lines is key to preventing costly repairs and preserving your warranty.
Professional installation provides peace of mind and guarantees your system will run efficiently for its full 15-20 year lifespan. At Volpe Service Company, our data-driven approach, honed since 1963, ensures your installation is done right the first time.
Ready to enjoy customized comfort in your home? Contact our experts for your Mini Split Installation Near Me.